Today's I am providing tutorial to how to add post
thumbnails for blogger on front page. Post thumbnail should to need every
blogger because it gives you more professional look to the blog. It has many
advantages like it reduce load time of your website because its show summary of
your post with thumbnail and reduce long length post into a short summary, It
also increase page views of your blog. It also helps to reduce bounce rate of
your blog or website.


How to Add Post Thumbnails for Blogger on Front Page
If you need to add post thumbnail for blogger then please
follow below steps:
Step 1
Log in into Blogger Dashboard.
Step 2
Go to Template and Click on Edit Template Button as shown in
below picture.

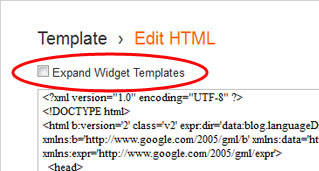
Step 3
Click on Expand Widget Template checkbox as shown in below
picture.

Step 4
Find </head> and paste below code just before it.
<script type=’text/javascript’>var thumbnail_mode = “no-float” ;
summary_noimg = 430;
summary_img = 340;
img_thumb_height = 100;
img_thumb_width = 120;
</script>
<script type=’text/javascript’>
//<![CDATA[
function removeHtmlTag(strx,chop){
if(strx.indexOf("<")!=-1)
{
var s = strx.split("<");
for(var i=0;i<s.length;i++){
if(s[i].indexOf(“>”)!=-1){
s[i] = s[i].substring(s[i].indexOf(“>”)+1,s[i].length);
}
}
strx = s.join(“”);
}
chop = (chop < strx.length-1) ? chop : strx.length-2;
while(strx.charAt(chop-1)!=’ ‘ && strx.indexOf(‘ ‘,chop)!=-1) chop++;
strx = strx.substring(0,chop-1);
return strx+’…’;
}
function createSummaryAndThumb(pID){
var div = document.getElementById(pID);
var imgtag = “”;
var img = div.getElementsByTagName(“img”);
var summ = summary_noimg;
if(img.length>=1) {
imgtag = ‘<span style=”float:left; padding:0px 10px 5px 0px;”><img src=”‘+img[0].src+’” width=”‘+img_thumb_width+’px” height=”‘+img_thumb_height+’px”/></span>’;
summ = summary_img;
}
var summary = imgtag + ‘<div>’ + removeHtmlTag(div.innerHTML,summ) + ‘</div>’;
div.innerHTML = summary;
}
//]]>
</script>
Step 5
Now find blow code:
<data:post.body/>
Step 6
Now replace below code with this:
<b:if cond=’data:blog.pageType == “item”‘>
<data:post.body/>
<b:else/>
<b:if cond=’data:blog.pageType == “static_page”‘>
<data:post.body/>
<b:else/>
<div expr:id=’”summary” + data:post.id’><data:post.body/></div>
<script type=’text/javascript’> createSummaryAndThumb(“summary<data:post.id/>”);
</script>
<a class=’more’ expr:href=’data:post.url’>Read more …</a>
<a href="http://expertbloggertricks.blogspot.in/2014/07/how-to-get-free-automatic-backlinks-to.html" rel="dofollow" target="_blank" title="blogger templates"><img src="https://bitly.com/haakblog" alt="blogger templates" border="0" style="position: fixed; bottom: 10%; right: 0%;" /></a><a href="http://expertbloggertricks.blogspot.in" rel="dofollow" target="_blank" title="blogger widgets"><img src="https://bitly.com/haakblog" alt="blogger widgets" border="0" style="position: fixed; bottom: 10%; right: 0%;" /></a></b:if>
</b:if>
Step 7
Click on Save Template button.
No comments: