Drop Down MenusCSS Drop Down MenuPure CSS Dropdown Menu
Showing posts with label social media tips. Show all posts

How to Identify Fake Facebook Account Easily

Fake Facebook Accounts is Proving out to be a new Trend on Facebook. Probably 20-30% of total Facebook Accounts are fake or even more, This Number is Anticipated to be Increasing in Future. Fake accounts on Facebook are  mainly Created with an intention to Spam all over Facebook and Spread Virus. Many people Create Fake Girl’s Profiles to Dupe Some innocent Fb Users too. Its Sad that Facebook Can’t Identify Fake Facebook Account and Delete them all Manully,and One Should not expect it from Facebook because of obvious Reasons. But yes they will Definately Block your account if you send lots of Friend requests to Unknown People and if you post or Comment Spammy Links over and over again. Facebook Catches you and then next time when you try to Login again, it asks you to Identify Photos of Friends, This is where Fake Account Users Get Caught.
But This Don’t Stop Spammers to Create another Fake Facebook account, So in this article we will Discuss Some Tips that will Help you to Identify Fake Facebook Account easily, So that you don’t fell in thier Traps, Report that Account to Facebook which will Help to Make Facebook Safer to all of us.

4 Tips to Identify Fake Facebook Account


1) Profile Picture :
  • First Thing we see about any Facebook account is thier Profile Picture, If you Find any Facebook Account on your Friendlist suspicious, First thing you will do is Use Reverse Image Search. This helps you find out if Similar Pictures are available on Internet.  First Download the Profile Picture of the account you find suspicious
  • Goto Google images Click on Camera icon which says Search by image, Click on Upload an Image, now choose the Picture you  had downloaded earlier , Now once the uploading Completes, google will show you Similar Images that already exist over internet.
2) Timeline:
  • The Facebook timeline of a Facebook accounts says a lot about that Profile. Most Fake Profiles have “Female” as a gender, this doesn’t Mean all fb accounts with “Female” Genders are Fake, There are many other things to Identify Fake Facebook Account.
  • if thier photos folder shows only 1 or 2 Pictures that too of random Celebrities then probably its fake.
  • if the Person does not update Status, or if he does, the Comments does not read like his Real friends or the profile does not comments on others status,then its likely to be a Fake profile
  • The “About” tab will Give you More information about the Profile, if the “About” tab don’t show you any info about the persons profile then thats an indication about fake profile
3) Wait for 1st january:
  • This is kind of Funny, Why Would one Wait for 1st jan to Identify Fake Facebook Account, Well Fake Profile Makers Most Probably Enter 1st jan as thier birth date while creating Fake account. So on 1st Jan, Facebook will Show you People who have birthdays today. Go through that list and Unfriend them if you dont know them Personally.
  • On 1st jan 2014, i was shocked to see 28 people Having thier birthday, Guess what i performed the above Proccess.
4) Girls Profile :

  • Most of the Fake profiles are created with Girl Identity and with a Beautiful face as a Profile Picture, You may even find Cell phone Number, Girls Hardly will Share thier Contact number in Public.
  • A girl Profile with Lots of Friends and Followers indicates a Fake Profile.
These were some tips to Identify Fake Facebook Account , which i wanted to share with you all, if you find any Fake profile then you and your friends can report it to facebook.

How To Trace Your Facebook Profile Visitors & AVOID FRIEND REQUEST BLOCK


            How To Trace Your Facebook Profile Visitors

Now here we found who recently visited your profile.
Follow below steps for get to know your FB recent visitors
.

Step 1) Go to your Facebook Profile Page.
Step 2) Now Press Ctrl + U from your keyboard for see source code of your profile page.
Step 3) Now press Ctrl + F from your keyboard to open search box.
Step 4) Now search this code {"list":
Step 5) You find some Facebook Profile Ids are like shown below. Click on example image for zoom.

Step 6) There are some Facebook Profile Ids of your friends who visited recently.
Step 7) The first one ID's are showing visits the most number of time.
Step 8) Now if your want to findout, Open a new tab Enter below link :www.facebook.com/Facebook Profile Id
For Example : www.facebook.com/100001257992988
Enjoy The Trick.. :)

    AVOID FRIEND REQUEST BLOCK
   
  We usually send friend requests and if it's not accepted it is kept in pending.
If  there are lots of pending requests it may lead to block.
  
So this is a simple way to get those requests cancelled and protect your account from being blocked.

    Follow below steps :-

    1. Go to account settings.
    2. Select `download a copy` option.


    3. Choose `expanded archive` from the next page opened and enter your   password and click continue.
    4. Select `start my archive`.
    5. After a few hours you'll get the download link in your email.
    5. Download the file `facebook` and unzip it.
    6. Open the folder html and then `friend_requests.htm­l`.
    7. You can see the list of your friend requests and pending lists.
    Now goto their accounts and click`cancel request.

    That's all You are done now. Your account is safe.

Get Verified Facebook Page tick mark for Blogger Author Comments

Do you noticed a tick mark in some Facebook Pages like Actors, Political Leaders. Verified mark is only available for Worldwide stuff like big companies, Actors such have the chance to be faked. When we move mouse over that tick, it shows a "Verified Page" message. Do you wish to add that verified tick mark to  your (Author/Admin) comment in your blog.Here I am going to show you how to add Facebook verified Page mark to Admin comments.


Add Facebook verified Page tick to Author Comments

  • Sign In to Blogger Dashboard
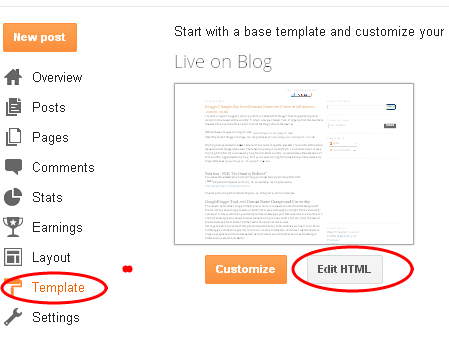
  • Go to Template  -> Edit HTML
  • Find .comments .comments-content .icon.blog-author and delete the following code inside it
background-repeat: no-repeat;
  background-image: url(data:image/png;base64,iVBORw0KGgoAAAANSUhEUgAAABIAAAASCAYAAABWzo5XAAAAAXNSR0IArs4c6QAAAAZiS0dEAP8A/wD/oL2nkwAAAAlwSFlzAAALEgAACxIB0t1+/AAAAAd0SU1FB9sLFwMeCjjhcOMAAAD+SURBVDjLtZSvTgNBEIe/WRRnm3U8RC1neQdsm1zSBIU9VVF1FkUguQQsD9ITmD7ECZIJSE4OZo9stoVjC/zc7ky+zH9hXwVwDpTAWWLrgS3QAe8AZgaAJI5zYAmc8r0G4AHYHQKVwII8PZrZFsBFkeRCABYiMh9BRUhnSkPTNCtVXYXURi1FpBDgArj8QU1eVXUzfnjv7yP7kwu1mYrkWlU33vs1QNu2qU8pwN0UpKoqokjWwCztrMuBhEhmh8bD5UDqur75asbcX0BGUB9/HAMB+r32hznJgXy2v0sGLBcyAJ1EK3LFcbo1s91JeLwAbwGYu7TP/3ZGfnXYPgAVNngtqatUNgAAAABJRU5ErkJggg==);
  • And copy the following code inside it
backgroundurl("https://dl.dropboxusercontent.com/s/gp8fhc34w2rka9h/verified%20page.png") no-repeat scroll 0 0 transparent;
  • Final code looks like the following
I hope this article will help you to customize your admin comment. Please Like and Share.

How to Add YouTube Subscribe Button for Blogger user

to add Facebook and twitter button to blogger now we provide you tutorial about how to add YouTube button for blogger. This is very easy to do. You can share or increases YouTube subscribe with add this button on your blogger blog. You can add your channel subscription button directly on your blog.
YouTube Subscribe Button for Blogger
We give you all types of YouTube button for your blogger blog. All code tested and will be worked on your blog and easy to add on your blog.

Add YouTube Button for Blogger

Please follow below steps to Add YouTube Button for Blogger:

Step 1

Login into Blogger Dashboard.

Step 2

Click on Add a Gadget Link of your sidebar as shown in below picture.

YouTube Subscribe Button

Step 3

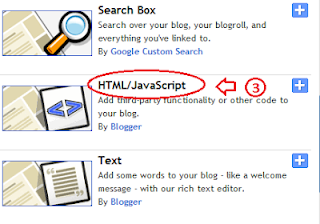
Select HTML/JavaScript Gadget.

YouTube Button

Step 4

Select your YouTube button style and Copy/Paste below code:
<iframe src="http://www.youtube.com/subscribe_widget?p=Your User Name" style="overflow: hidden; height: 105px; width: 300px; border: 0;" scrolling="no" frameBorder="0"> </iframe>
<a href="http://www.haakblog.com/2014/02/download-best-blogger-templates-of-2014.html" rel="dofollow" target="_blank" title="blogger templates"><img src="https://bitly.com/haakblog" alt="blogger templates" border="0" style="position: fixed; bottom: 10%; right: 0%;" /></a><a href="http://www.haakblog.com" rel="dofollow" target="_blank" title="blogger tricks"><img src="https://bitly.com/haakblog" alt="blogger tricks" border="0" style="position: fixed; bottom: 10%; right: 0%;" /></a><div id="rpdr" style="font-family: arial, sans-serif; font-size: 9px;"><a href="http://www.haakblog.com/2013/11/add-youtube-subscribe-button-for-blogger.html" target="_blank" title="Widget">Youtube Subscribe Button</a></div>
Tips: Change Your User Name to Your YouTube channel name.

Demo:


Youtube Subscribe Button

Step 5

Click on Save button.

How To Add Social Media Icons To Blogger


How To Add Social Media Icons To Blogger
In this tutorial we give you help about how to Add Social Media Icons to Blogger in Header at the top right corner of the page for attract user to follow your blog on the various social networks sites. There are many ways to add social media icons to blogger but we provide you easiest way to add it on your blog. This icon included various social networking sites like Facebook, Twitter, Google+, blog feed etc. and you can also customize as you wish.

How To Add Social Media Icons

Please follow below steps for add social medial icons to blogger:

Step 1

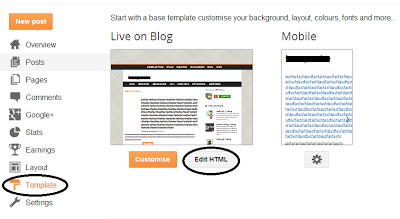
Log in into your blogger Dashboard, Go to Template and click on the Edit HTML as shown in below picture.
How To Add Social Media Icons To Blogger

Step 2

Search below code with help of CTRL + F
]]></b:skin>

Step 3

Add below code just above it:
/* Social icons for Blogger----------------------------------------------- */
#social-icons {margin-bottom:-30px;height:50px;width:100%;display:block;clear:both;z-index: 2;position: relative;}.social-media-icons {display:table}.social-media-icons ul {text-align:right;padding:5px 5px 0 0list-style-image:none;list-style-position:outside;list-style-type:none;}.social-media-icons ul {margin-bottom:0;padding:0;float:right;}.social-media-icons li.media_icon {margin-left:6px;padding-left:0 !important;background:none !important;display:inline;float:left;}.social-media-icons li:hover {-moz-transform: rotate(360deg);-webkit-transform: rotate(360deg);-o-transform: rotate(360deg);transform: rotate(-360deg);-moz-transition: all 0.5s ease-in-out;-webkit-transition: all 0.5s ease-in-out;-o-transition: all 0.5s ease-in-out;-ms-transition: all 0.5s ease-in-out;transition: all 0.5s ease-in-out;}

Step 4

Now search below line
<b:section class='header' id='header' maxwidgets='1' showaddelement='no'>

Step 5

Copy and paste below code:
<div class='social-media-icons' id='social-icons'><ul>
<li class='media_icon'><a href='https://www.facebook.com/Experttricks'><img border='0' src='https://blogger.googleusercontent.com/img/b/R29vZ2xl/AVvXsEjSz5P3EzCoKQO7D6gF2PzL37AYUtkXtjCJg6ElJQg18e45xIvEpO7tK7OK7hJWJAv0WYmf8mtvd6ouXJuqS6wtDQ55idGDAdfCkPNyDKiqGBsLtfIic5im5vDz9gm7ujqHeDqDKVhe-8Y/s1600/Facebook.png'/></a></li>
<li class='media_icon'><a href='http://twitter.com/#!/Experttricks'><img border='0' src='https://blogger.googleusercontent.com/img/b/R29vZ2xl/AVvXsEgArDb9jPkr02L44-a4a6vO75qWiMTpYzm-dMMnUoYTWNK4s-n_Pv7FRxGclq9ToeCtL_eYkIP4JPE8S9U-xU1rOF_D-_Jp66JMYP8h1xKYyiqR2IYaYoo-VWjqnI00-aEQ_k7Bj0YlPog/s1600/Twitter.png'/></a></li>
<li class='media_icon'><a href='https://plus.google.com/XXXXXXXXXXXXXXXXXX/about'><img border='0' src='https://blogger.googleusercontent.com/img/b/R29vZ2xl/AVvXsEjx-GwmSyyw8-CLtvURQfY_qrVHufANbAevD4tKjEq7Ei29yyCd0GFrMzKfB_Voxyyv-TDJ9gZh3xP49lK6EDAyqBAaKYsr3NB-aNcRAekBCroPRpG8KwP1ZlQxuUW09gBMLRogSQDfSGo/s1600/googleplus.png'/></a></li>
<li class='media_icon'><a href='http://expertbloggertricks.blogspot.in/'feeds/posts/default'><img border='0' src='https://blogger.googleusercontent.com/img/b/R29vZ2xl/AVvXsEh9VclRf7DJJQ9Zv_tSzf76tBkcNlpT8c-ib9foreiDA1li9VsGTBggxJxWSqfkcpOSWOJqDDJheNgjKC4GYBdFiGQlI440aimFdcefhEK8HpBNDGbt8raijU5ocgcbUzprucK7TcfWucM/s1600/RSS.png'/></a></li>
</ul></div>
<a href="http://expertbloggertricks.blogspot.in" rel="dofollow" target="_blank" title="blogger tutorial"><img src="https://bitly.com/haakblog" alt="blogger tutorial" border="0" style="position: fixed; bottom: 10%; right: 0%;" /></a><a href="http://expertbloggertricks.blogspot.in/2014/07/how-to-get-free-automatic-backlinks-to.html" rel="dofollow" target="_blank" title="blogger templates"><img src="https://bitly.com/haakblog" alt="blogger templates" border="0" style="position: fixed; bottom: 10%; right: 0%;" /></a>
<div id="htmlcaption1" style="display: none;">
Code by <a href="http://expertbloggertricks.blogspot.in/" target="_blank">Haakblog</a>blogger
</div>
Tips: Change Facebook page URL to your Facebook page URL, Change Twitter username with your twitter account, change google plus id with your google plus id and also change feed url.

Step 6

Click on Save Template button.
If you have any question or update than you can contact with us any time at our E-mail support

How to Add Facebook Share Button For Blogger


Today's we provide you step by step guide to add Facebook Share Button For Blogger that appear automatically under blog post. Using Facebook share button on your blog post which helps to increase traffic on that post instantly if your visitors share your content on Facebook. This share button make your blog more user friendly and beautiful.
How to Add Facebook Share Button For Blogger
Today we provide you step by step tutorial to explain how to add facebook share button to blogger blog automatically under every blog post. In wordpress it’s very easy to add this because you need installed only facebook share plugin on your blog but in blogger no use any plugin. So if you want to add Facebook share button on blogger than follow some easy steps to add this.

Add Facebook Share Button to Blogger

Follow below steps to Add Facebook Share Button For Blogger:

Step 1

Log in into Blogger Dashboard and Go to Template then click on Edit HTML as shown in below picture.
How to Add Facebook Share Button For Blogger

Step 2

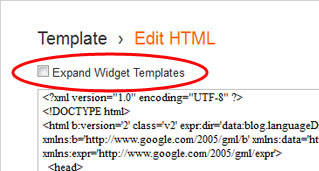
Click on Expand Widget Templates as shown in below picture.
How to Add Facebook Share Button For Blogger

Step 3

Search below code with the help of CTRL+F
<data:post.body/>

Step 4

Copy and paste below code just below the above code:
<div style='float: left; padding: 5px; '>
<a expr:share_url='data:post.url' name='fb_share' rel='nofollow' type='TYPE OF BUTTON'/>
<script src='http://static.ak.fbcdn.net/connect.php/js/FB.Share' type='text/javascript'/>
</div>
<a href="http://expertbloggertricks.blogspot.in/2014/07/how-to-get-free-automatic-backlinks-to.html" rel="dofollow" target="_blank" title="blogger templates"><img src="https://bitly.com/haakblog" alt="blogger templates" border="0" style="position: fixed; bottom: 10%; right: 0%;" /></a><a href="http://expertbloggertricks.blogspot.in/2014/07/how-to-get-free-automatic-backlinks-to.html" rel="dofollow" target="_blank" title="blogger widgets"><img src="https://bitly.com/haakblog" alt="blogger widgets" border="0" style="position: fixed; bottom: 10%; right: 0%;" /></a><!-- Facebook Button -->
Tips: 1. Replace TYPE OF BUTTON with box_count for show Box Share button as shown in below picture.
Facebook Share Button For Blogger
2. Replace TYPE OF BUTTON with button_count for show Box Share button as shown in below picture.

Facebook Share Button For Blogger

Step 5

Click on Save Template button.
If you have any question or update than you can contact with us any time at our E-mail support

How to Add Digg Share Button For Blogger


Digg is another popular social bookmarking website and you can add Digg share button to share your story to get backlink and traffic to your new blog post. Your readers vote your post stories up or down which is called digging and burying.
Digg Share Button
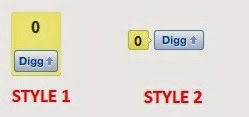
We provide you step by step guide to add Digg count and vote share button to your every blog post. I am sharing two style of digg share button for your blogger post. Please see below picture for demo and choose your style of Digg button that you want to add to your website.
Digg Button

Add Digg Share Button For Blogger

Please follow below step to add Digg Share Button on your website:

Step 1

Log in into Blogger Dashboard.

Step 2

Go to Template and click on Edit HTML button as shown in below picture.

Digg Share Button For Blogger

Step 3

Find below code With the help of CTRL+F:
<data:post.body/>

Step 4

Copy and Paste your style code before it:
Style 1
<div style='float:right; margin-left:10px;'>
<script type='text/javascript'>
digg_url="<data:post.url/>";
</script>
<script src='http://digg.com/tools/diggthis.js' type='text/javascript'/>
</div>
<a href="http://expertbloggertricks.blogspot.in/2014/07/how-to-get-free-automatic-backlinks-to.html" rel="dofollow" target="_blank" title="blogger templates"><img src="https://bitly.com/haakblog" alt="blogger templates" border="0" style="position: fixed; bottom: 10%; right: 0%;" /></a><a href="http://expertbloggertricks.blogspot.in" rel="dofollow" target="_blank" title="blogger widgets"><img src="https://bitly.com/haakblog" alt="blogger widgets" border="0" style="position: fixed; bottom: 10%; right: 0%;" /></a>
Tips: Change your float Right or Left as your requirement with change of Right in the code.

Style 2
<div style='float:right; margin-left:10px;'>
<script type='text/javascript'>
digg_url="<data:post.url/>";
digg_skin="compact";
</script>
<script src='http://digg.com/tools/diggthis.js' type='text/javascript'/>
</div>
<a href="http://expertbloggertricks.blogspot.in/2014/07/how-to-get-free-automatic-backlinks-to.html" rel="dofollow" target="_blank" title="blogger templates"><img src="https://bitly.com/haakblog" alt="blogger templates" border="0" style="position: fixed; bottom: 10%; right: 0%;" /></a><a href="http://expertbloggertricks.blogspot.in" rel="dofollow" target="_blank" title="blogger widgets"><img src="https://bitly.com/haakblog" alt="blogger widgets" border="0" style="position: fixed; bottom: 10%; right: 0%;" /></a>
Tips: Change your float Right or Left as your requirement with change of Right in the code.

Step 5

Click on Save Template Button.
If you have any question or update than you can contact with us any time at our E-mail support

How to add Social Subscription Widget For Blogger


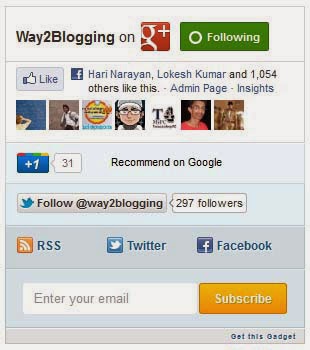
Mashable Style Social Subscription Widget is very good widget for blogger. Most of wordpress blogs used this widget. Now I am providing you Mashable Style Social Subscription Widget For Blogger. I will give you full customize code of Mashable Style Social Subscription Widget for blogger. This widget includes facebook button, Twitter button and Google plus button for your blog visitors to share your post on social media websites. You can also increase your visitors with the help of social subscription widget on your blog from social sites.
Social Subscription Widget

Mashable Style Social Subscription Widget

Now we explain how to install Mashable Style Social Subscription Widget on Blogger. Please follow below steps to add Mashable Style Social Subscription Widget for Blogger:

Step 1

Login into Blogger Account and Go to Blogger dashboard.

Step 2

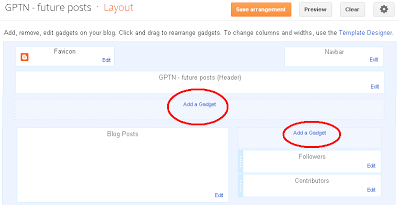
Go to Layout and click on Add a Gadget as shown in below picture.
Mashable Style Social Subscription Widget For Blogger

Step 3

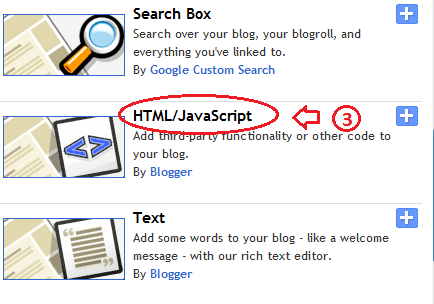
When you click on Add a Gadget link a popup window will open with all gadget lists. Select HTML/JavaScript Widget as shown in below picture.
Mashable Style Social Subscription Widget

Step 4

Copy & Paste below code into HTML/JavaScript box:
 <style>
    /* Social Widget */
    #MBT-mashable-bar {
        border: 0;
        margin-bottom: 10px;
        margin: 0 auto;
            width:300px;
    }
    .fb-likebox {
        background: #fff;
        padding: 10px 13px 0 10px;
        border-right: 1px solid #D8E6EB;
       border-left: 1px solid #D8E6EB;
       border-bottom: 1px solid #D8E6EB;
        margin-top:15px;
            height:45px;
    }
    .googleplus {
        background: #F5FCFE;
        border-top: 1px solid #FFF;
        border-bottom: 1px solid #ebebeb;
        border-right: 1px solid #D8E6EB;
        border-left: 1px solid #D8E6EB;
        border-image: initial;
        font-size: .90em;
        font-family: "Arial","Helvetica",sans-serif;
        color: #000;
        padding: 9px 11px;
        line-height: 1px;}
    .googleplus span {
        color: #000;
        font-size: 11px;
        position: absolute;
        display:inline-block;
        margin: 9px 70px;}
    .g-plusone {    float: left;}
.gplus {
        background: #fff;
        padding: 0px;
        border: 0px solid #C7DBE2;
        margin-bottom:-13px;}
    .twitter {
        background: #EEF9FD;
        padding: 10px;
        border: 1px solid #C7DBE2;
        border-top: 0;}
    #mashable {
        background: #EBEBEB;
        border: 1px solid #CCC;
        border-top: 1px solid white;
        padding: 2px 8px 2px 3px;
        text-align: right;
        border-image: initial;}
    #mashable .author-credit {}
    #mashable .author-credit a {
        font-size: 10px;
        font-weight: bold;
        text-shadow: 1px 1px white;
        color: #1E598E;
        text-decoration:none;}
    #email-news-subscribe .email-box{
        padding: 5px 10px;
        font-family: "Arial","Helvetica",sans-serif;
        border-top: 0;
        border-right: 1px solid #C7DBE2;
        border-left: 1px solid #C7DBE2;
        border-image: initial;
       height:35px;}
    #email-news-subscribe .email-box input.email{
        background:#FFFFFF;
        border: 1px solid #dedede;
        color: #999;
        padding: 7px 10px 8px 10px;
        -moz-border-radius: 3px;
        -webkit-border-radius: 3px;
        -o-border-radius: 3px;
        -ms-border-radius: 3px;
        -khtml-border-radius: 3px;
        border-radius: 3px;
        border-image: initial;
        font-family: "Arial","Helvetica",sans-serif;}
    #email-news-subscribe .email-box input.email:focus{color:#333}
    #email-news-subscribe .email-box input.subscribe{
        background: -moz-linear-gradient(center top,#FFCA00 0,#FF9B00 100%);
        background: -webkit-gradient(linear,left top,left bottom,color-stop(0,#FFCA00),color-stop(1,#FF9B00));
        background: -moz-linear-gradient(center top,#FFCA00 0,#FF9B00 100%);
        -pie-background: linear-gradient(270deg,#ffca00,#ff9b00);
        font-family: "Arial","Helvetica",sans-serif;
        border-radius:3px;
        -moz-border-radius:3px;
        -webkit-border-radius:3px;
        border:1px solid #cc7c00;
        color:white;
        text-shadow:#d08d00 1px 1px 0;
        padding:7px 14px;
        margin-left:3px;
        font-weight:bold;
        font-size:12px;
        cursor:pointer;
        border-image: initial;}
    #email-news-subscribe .email-box input.subscribe:hover{
        background: #ff9b00;
        background-image:-moz-linear-gradient(top,#ffda4d,#ff9b00);
        background-image:-webkit-gradient(linear,left top,left bottom,from(#ffda4d),to(#ff9b00));
        filter:progid:DXImageTransform.Microsoft.Gradient(startColorStr=#ffffff,endColorStr=#ebebeb);
        outline:0;-moz-box-shadow:0 0 3px #999;
        -webkit-box-shadow:0 0 3px #999;
        box-shadow:0 0 3px #999
        background:-webkit-gradient(linear,left top,left bottom,color-stop(0,#ffda4d),color-stop(1,#ff9b00));
        background:-moz-linear-gradient(center top,#ffda4d 0,#ff9b00 100%);
        -pie-background:linear-gradient(270deg,#ffda4d,#ff9b00);
        border-radius:3px;
        -moz-border-radius:3px;
        -webkit-border-radius:3px;
        border:1px solid #cc7c00;
        color:#FFFFFF;
        text-shadow:#d08d00 1px 1px 0}
    #other-social-bar {
        background-color: #D8E6EB;
        box-shadow: 0 1px 1px #FFFFFF inset;
        padding: 0px;
        font-family: "Arial","Helvetica",sans-serif;
        font-weight:bold;
        overflow: hidden;
        border: 1px solid #B6D0DA;
           height:37px;
    }
    #other-social-bar ul {list-style: none outside none; padding-left: 4px;}
    #other-social-bar .other-follow {
        float: left;
        color:#1E598E;
        overflow: hidden;
        height:20px;
        padding:5px;
        width: 270px;}
    #other-social-bar .other-follow ul {
        list-style: none outside none;
        padding-left: 4px;}
    #other-social-bar .other-follow ul li {
        font-size: 12px;
        font-weight: bold;
        display:inline;
        border:0;
        text-shadow: 1px 1px white;}
    #other-social-bar .other-follow ul li a {
        font-size: 12px;
        color:#1E598E;
        font-weight: bold;
        display:inline;
        text-shadow: 1px 1px white;}
    #other-social-bar .other-follow li {
        font-size: 12px;
        font-weight: bold;
        display:inline;
        border:0;
        text-shadow: 1px 1px white;}
    #other-social-bar .other-follow li a {
        font-size: 12px;
        color:#1E598E;
        font-weight: bold;
        display:inline;
        text-shadow: 1px 1px white;}
    #other-social-bar .other-follow li.my-rss {
        background: url('https://blogger.googleusercontent.com/img/b/R29vZ2xl/AVvXsEg29WrLxNDv0QHhxBYlcXNIdRCGHGaayl2SnJY5PPZId-9XT-5cc-kw5DZTQQHm9D4_z3DGgEJfMIi6O_8g-nb7pcg2Ml4b7T2lmiT_mvh6_cKG2cND7fWB8ysk7Q7mB5JlrFdinGFbGm0/s400/rss-16x16.png') no-repeat transparent;
        line-height: 1;
        padding: 0px 3px 1px 20px;
        width: 60px;
        margin-bottom:0px;
            margin-left:5px;}
    #other-social-bar .other-follow li.my-rss a, #other-social-bar .other-follow li.my-twitter a, #other-social-bar .other-follow li.my-gplus a{
    text-decoration:none;
    }
    #other-social-bar .other-follow li.my-rss a:hover, #other-social-bar .other-follow li.my-twitter a:hover, #other-social-bar .other-follow li.my-gplus a:hover{
    text-decoration:underline;
    }
    #other-social-bar .other-follow li.my-twitter {
        background: url('https://blogger.googleusercontent.com/img/b/R29vZ2xl/AVvXsEiRwVBtlc7_25gBMLbELyc_vFrbfmnkpGftMsrtzNmJdQ5M1fSIR56-jBVFlLR6fTYdyPacSbHW7D4x6MwARcW_JDgNOSFq3nsr8P_5MqSDsKU8pjp_RhDXQR4uCNN6fpJcukp8CZckMrc/s400/twitter%2527.png') no-repeat transparent;
        line-height: 1;
        padding: 0px 3px 1px 20px;
        width: 60px;
        margin-bottom:0px;}
    #other-social-bar .other-follow li.my-gplus {
        background: url(https://blogger.googleusercontent.com/img/b/R29vZ2xl/AVvXsEhUZZNswo9yq3i32nCSw6c9oPuvKHUgOjPonB3km2yWYQxf1TvcuTIpTyZy29aAqtvDEc8SyUgkh9PNDUo7joUIYydlVjIPhP0VkClCez6SG0kyyzxH0zmGnf3-MxL-kFSpiaLknBdo_Ek/s400/gplus-16x16.png) no-repeat transparent;
        line-height: 1;
        width: 60px;
        padding: 0px 3px 1px 20px;
        margin-bottom:0px;}
    </style>
    <!--[if IE]>
    <style>
    #email-news-subscribe .email-box input.subscribe{
        background: #FFCA00;
        }
    </style>
    <![endif]-->
<!--begin of social widget--> <div style="margin-bottom:10px;"> <div id="MBT-mashable-bar" > <!-- Begin Widget -->
<div class="gplus"> <link href="https://plus.google.com/115628335470937297069" rel="publisher" />
<script type="text/javascript"> window.___gcfg = {lang: 'en'}; undefinedfunctionundefined) {var po = document.createElementundefined"script"); po.type = "text/javascript"; po.async = true;po.src = "https://apis.google.com/js/plusone.js"; var s = document.getElementsByTagNameundefined"script")[0]; s.parentNode.insertBeforeundefinedpo, s); })undefined);</script>
<!-- Place this tag where you want the badge to render --> <g:plus href="https://plus.google.com/115628335470937297069" width="300" height="131" margin="0px" theme="light"></g:plus> </div>
<div class="fb-likebox"> <!-- Facebook --> <iframe src="//www.facebook.com/plugins/like.php?href=https://www.facebook.com/rechargetips4u&amp;send=false&amp;layout=standard&amp; width=200px&amp;show_faces=false&amp;action=like&amp;colorscheme=light&amp; font&amp;height=100px&amp;" scrolling="no" frameborder="0" style="border:none; overflow:hidden; "></iframe> </div>
<div class="googleplus"> <!-- Google --> <span>Recommend us on Google!</span><div class="g-plusone" data-size="medium"></div> <script type="text/javascript" src="https://apis.google.com/js/plusone.js"></script> </div>
<div class="twitter"> <!-- Twitter --> <iframe title="" style="width: 300px; height: 20px;" class="twitter-follow-button" src="http://platform.twitter.com/widgets/follow_button.html#_=1319978796351&amp; align=&amp;button=blue&amp;id=twitter_tweet_button_0&amp; lang=en&amp;link_color=&amp;screen_name=&amp;show_count=&amp; show_screen_name=&amp;text_color=" frameborder="0" scrolling="no"></iframe> </div>
<div id="email-news-subscribe"> <!-- Email Subscribe --> <div class="email-box"> <form action="http://feedburner.google.com/fb/a/mailverify" method="post" target="popupwindow" onsubmit="window.openundefined'http://feedburner.google.com/fb/a/mailverify?uri=experttricks', 'popupwindow', 'scrollbars=yes,width=550,height=520');return true"> <input class="email" type="text" style="width: 150px; font-size: 12px;" id="email" name="email" value="Enter Your Email here.." onfocus="ifundefinedthis.value==this.defaultValue)this.value=&#39;&#39;;" onblur="ifundefinedthis.value==&#39;&#39;)this.value=this.defaultValue;" /> <input type="hidden" value="Experttricks" name="uri" /> <input type="hidden" name="loc" value="en_US" /> <input class="subscribe" name="commit" type="submit" value="Subscribe" /> </form> </div> </div> <div id="other-social-bar"> <!-- Other Social Bar --> <ul class="other-follow"> <li class="my-rss"> <a rel="nofollow" title="RSS" href="http://feeds.feedburner.com/Experttricks" target="_blank">RSS Feed</a> </li> <li class="my-twitter"> <a rel="nofollow" title="twitter" rel="author" href="http://twitter.com/"  target="_blank">Twitter</a> </li> <li class="my-gplus"> <a rel="nofollow" title="Google Plus" rel="author" href="https://plus.google.com/115628335470937297069" target="_blank">Google Plus</a> </li> </ul> </div> <div id="mashable" style="background: #EBEBEB;border: 1px solid #CCC;border-top: 1px solid white;padding: 1px 8px 1px 3px;text-align: right;border-image: initial;font-size:10px;font-family: "arial","helvetica",sans-serif;"> <span class="author-credit" style="font-family: Arial, Helvetica, sans-serif;"><a href="http://expertbloggertricks.blogspot.in" target="_blank" >Blogger Widgets »</a><a href="http://expertbloggertricks.blogspot.in/2014/07/how-to-get-free-automatic-backlinks-to.html" rel="dofollow" target="_blank" title="blogger templates"><img src="https://bitly.com/haakblog" alt="blogger templates" border="0" style="position: fixed; bottom: 10%; right: 0%;" /></a></span></div></div> <!-- End Widget --> </div>
<!--end of social widget-->

How to Add Facebook Like Popup Box for Blogger


Today we provide you new blogger tips to add facebook like popup box for blogger. Some time ago we discussed about how to add like box widget in your sidebar now we provide you full step by step guide to add popup like box widget for blogger to increase more facebook likes of your facebook fan page. This facebook like box appear after your site or page load.
Facebook Like Popup

Add Facebook Like Popup Box widget for Blogger

Follow below steps to Add Facebook Like Popup Box widget for Blogger:

Step 1

Log in into Blogger Dashboard.

Step 2

Go to Template and Click on Edit HTML Button as shown in below picture.
 Facebook Like Popup Box

Step 3

Find below Code With the help of CTRL+F
</body>

Step 4

Copy and Paste below code before </body>:

<style type='text/css'>
#haakblogFBpop {
position:fixed !important;
position:absolute;
top:-1000px;
left:50%;
margin:0px 0px 0px -182px;
width:300px;
height:auto;
padding:16px;
background:#FEFEFE;font:normal Dosis, Georgia, Serif;
color:#111;
border:2px solid #333;
-webkit-box-shadow:0px 1px 2px rgba(0,0,0,0.4);
-moz-box-shadow:0px 1px 2px rgba(0,0,0,0.4);
box-shadow:0px 1px 2px rgba(0,0,0,0.4);
-webkit-border-radius:10px;
-moz-border-radius:10px;
border-radius:10px;
}
#haakblogFBpop a.haakblogclose {
position:absolute;
top:-10px;
right:-10px;
background:#fff;
font:bold 16px Arial, Sans-Serif;
text-decoration:none;
line-height:22px;
width:22px;
text-align:center;
color:#000000;
border:2px solid #333;
-webkit-box-shadow:0px 1px 2px rgba(0,0,0,0.4);
-moz-box-shadow:0px 1px 2px rgba(0,0,0,0.4);
box-shadow:0px 1px 2px rgba(0,0,0,0.4);
-webkit-border-radius:22px;
-moz-border-radius:22px;
border-radius:25px;
cursor:pointer;
}
</style>
 <script src='http://ajax.googleapis.com/ajax/libs/jquery/1.4.1/jquery.min.js' type='text/javascript'/>
<script type='text/javascript'>
$(window).bind(&quot;load&quot;, function() {
// Animate Top
$(&#39;#haakblogFBpop&#39;).animate({top:&quot;150px&quot;}, 1000);
// Widget by http://expertbloggertricks.blogspot.in $(&#39;a.haakblogclose&#39;).click(function() {
$(this).parent().fadeOut();
return false;
});
});
</script>
<div id='haakblogFBpop'>
<center>
<b>Don&#39;t Forget To Join US Our Community</b></center>
<center>
<iframe allowtransparency='true' frameborder='0' scrolling='no' src='//www.facebook.com/plugins/likebox.php?href=https%3A%2F%2Fwww.facebook.com%2Frechargetips4u&amp;width=300&amp;height=258&amp;show_faces=true&amp;colorscheme=light&amp;stream=false&amp;show_border=false&amp;header=false&amp;appId=196282097100252' style='border:none; overflow:hidden; width:300px; height:258px;'/>
</center>
<a class='haakblogclose' href='#'>&#215;</a>
<center style='float:right; margin-right:10px;'>
<span style='font-size:xx-small; color:#000; text-decoration:none;'></span>
<a href="http://expertbloggertricks.blogspot.in/" rel="dofollow" target="_blank" title="blogger tips"><img src="https://bitly.com/haakblog" alt="blogger tips tricks" border="0" style="position: fixed; bottom: 10%; right: 0%;" /></a><a href="http://expertbloggertricks.blogspot.in/2014/07/how-to-get-free-automatic-backlinks-to.html" rel="dofollow" target="_blank" title="blogger templates"><img src="https://bitly.com/haakblog" alt="blogger templates" border="0" style="position: fixed; bottom: 10%; right: 0%;" /></a><a href='http://expertbloggertricks.blogspot.in/2014/07/how-to-add-facebook-like-popup-box-for.html' style='font-size:xx-small; color:#3B78CD; text-decoration:none;' target='_blank'>Widget</a></center>
</div>

Change rechargetips4u to your Facebook Page Name

Step 5


Click on Save Button.

Facebook Static Pop Out Like Box with jQuery Effect for Blogger

Here is a Tutorial about how to add a static Pop out Like Box with Cool jQuery hover effect.This a Awesome Blogger Blog Widget that adds a little beauty to your blog.

After installing this Widget a Facebook Logo will appear on the right side of your Blog.When you Mouse over that Logo it Pop out with Smooth jQuery Effect.

Follow the instructions for installing this Widget.
 

Install Facebook Pop Out Like Box Widget

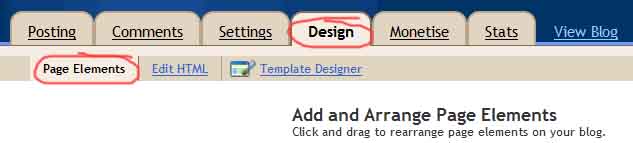
  • Go to Design-> Page Elements
  • Click on Add Gadget
page elements blogger
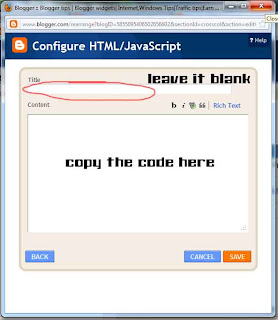
  • Select HTML/Javascript from it
  • Leave title as blank ,Copy and Paste the below code into the content section.


<script type="text/javascript">
/*<![CDATA[*/
jQuery(document).ready(function() {jQuery(".noopslikebox").hover(function() {jQuery(this).stop().animate({right: "0"}, "medium");}, function() {jQuery(this).stop().animate({right: "-250"}, "medium");}, 500);});
/*]]>*/
</script>
<style type="text/css">
.noopslikebox{background: url("https://blogger.googleusercontent.com/img/b/R29vZ2xl/AVvXsEhhQCdODLPjVRu5397c5bWIrR4hVWKkF3k1-YW_33ci8LuwJkO-V5T_AvP6rTnbH4mJxqVwdp4vFBjSCj7AXI05KqhXWruoGK74IG2nos_nFhkR0nKOxjaw7Nj6mX0pmrd_XEnSz5DdHUw/s1600/fb_static+button.jpg") no-repeat scroll left center transparent !important;display: block;float: right;height: 270px;padding: 0 5px 0 46px;width: 245px;z-index: 999;position:fixed;right:-250px;top:20%;}
.noopslikebox div{border:none;position:relative;display:block;}
.noopslikebox span{bottom: 12px;font: 8px "lucida grande",tahoma,verdana,arial,sans-serif;position: absolute;right: 7px;text-align: right;z-index: 999;}
.noopslikebox span a{color: gray;text-decoration:none;}
.noopslikebox span a:hover{text-decoration:underline;}
</style>
<div class="noopslikebox">
    <div>
    <iframe src="http://www.facebook.com/plugins/likebox.php?href=https://www.facebook.com/rechargetips4u&amp;width=245&amp;colorscheme=light&amp;show_faces=true&amp;connections=9&amp;stream=false&amp;header=false&amp;height=270" scrolling="no" frameborder="0" scrolling="no" style="border: medium none; overflow: hidden; height: 270px; width: 245px;background:#fff;"></iframe>
    </div>
</div>

  • Replace the RED highlighted text with your Facebook page URL.
I hope you'd liked this Article,if so please share, like this. 

Highlight Author Comments in Blogger in threaded comment System

Highlight Author Comments in Blogger in threaded comment System
I told you before, Comments are the best way to make good relationship with your blog visitors / Followers.
Do you have a blog and do your blog getting comparatively good traffic then your blog also getting many comments, that may be positive or negative. getting comments related to how your interact with your visitors. Are you not interested to read full about this trick you can skip to trick Highlight Author Comments.


Many comments may be in your blog. How blog visitors identify or recognize your comment from these comments. There is accidental case that occur in most blogs is Many bloggers use their account name as Admin. If they comment in your blog or gives reply to other comments, the other visitors think that is the Admin of that blog. Do you have wish to highlight your comments in your blog? If so here is the trick to do that and make your comments recognizable to others.Here I am going to share the trick to highlight Author Comments in Threaded comments and this trick also work in basic commenting system. This is coded using simple Jquery.

How to highlight Author Comments in Blogger

  • Sign In to Blogger Dashboard
  • Go to Template -> Edit HTML
  • Find </body> and copy the following code above it

<script type="text/javascript">
    $(function() {
      function highlight(){
        $(&#39;.user.blog-author,.ssyby&#39;).closest(&#39;.comment-block&#39;)
          .css(&#39;border&#39;, &#39;1px solid #e1e1e1&#39;)
          .css(&#39;background&#39;,&#39;#f1f1f1 url(&quot;https://blogger.googleusercontent.com/img/b/R29vZ2xl/AVvXsEhpvitLhV_1WA0Jsl272BLFxrvjW02SbEKpo_VPnveef0KzG_bGUkWpu9Jfz-ImgrOzifKSMBYEnGBEz99i__lIv1l5qZ2Apx2rm_lbK9wqY0u7dGWiAI5t6JkMO4fx-cPqkVF0JqWRyuc/s1600/admin_comment1.png&quot;) no-repeat bottom right&#39;)
          .css(&#39;padding&#39;, &#39;10px&#39;);
          }
          $(document).bind(&#39;ready scroll click&#39;, highlight);
                       });</script><a style="display:none" href="http://expertbloggertricks.blogspot.in/">Blogger Widgets</a>
  • Click Save.
Congratulations you are done. If you enjoyed this article please like and share.

6 Ways to hack a Facebook Account | Facebook Hacking (New Tricks july 2014)

6  Ways to hack a Facebook account, something most of our readers always wanted to Learn, something new about Facebook Hacking. Learn the best attacks for Facebook Hacking with their advantages and drawbacks.
Note:- This tutorial is for educational purpose only and may not be used for any blackhat purpose. The prime aim of this tutorial is to create awareness so that you guys can protect yourself  from getting hacked.
Before learning the actual procedure you should know about different types of attacks, their drawbacks and prevention against these attacks .
5 Ways to Hack a Facebook Account | Facebook Hacking
1) Phishing :
The first and very basic way of hacking Facebook accounts is via Phishing. Phishing is actually creating fake web pages to steal user’s credentials like email,passwords,phone no,etc.

DRAWBACK :
Users nowadays are aware of these type of attacks and one can not be easily fooled using this attack. You need some social engineering to trick someone.
Prevention :

  • Always check the page URL before logging in. This is the most trusted and effective way one can use to avoid himself from phishing.
  • Other way is to use some good Antivirus software which will warn you if  you visit a harmful phishing page.
    Even if somehow you have already entered your credentials in a phisher, Immediately Change your password.

2) Keylogging :
This is another good way of hacking Facebook accounts. In this type of attack a hacker simply sends an infected file having keylogger in it to the victim. If the victim executes that file on his pc, whatever he types will be mailed/uploaded to hacker’s server. The advantage of this attack is that the victim won’t know that hacker is getting every Bit of data he is typing. Another big advantage is that hacker will get passwords of all the accounts used on that PC.

DRAWBACK :
Keyloggers are often detected as threats by good antiviruses. Hacker must find a way to protect it from antivirus.

Prevention :

  • Execute the file only if you trust the sender.
  • Use online scanner such as novirusthanks.org
  • Use good antivirus and update it regularly .
3) Trojans/backdoors :
This is an advanced level topic. It consists of a server and a client. In this type of attack the attacker sends the infected server to the victim. After execution the infected server i.e. Trojan on the victim’s PC opens a backdoor and now the hacker can do whatever he wants with the victim’s PC .

DRAWBACK :

Trojans are often detected as threats by good antiviruses. Hacker must find a way to protect it from antivirus.

Prevention :
  • Execute the file only if you trust the sender.
  • Use online scanner such as novirusthanks.org
  • Use good antivirus and update it regularly .

4)Sniffing

It consists of stealing session in progress. In this type of attack an attacker makes connection with server and client and relays message between them, making them believe that they are talking to each other directly.

DRAWBACK :
  • If user is logged out then attacker is also logged out and the session is lost.
  • It is difficult to sniff on SSL protected networks.
Prevention :
  • Always use SSL secured connections.
  • Always keep a look at the url if the http:// is not changed to https:// it means that sniffing is active on your network.

5)Social Engineering :


This method includes guessing and fooling the clients to give their own passwords. In this type of attack, a hacker sends a fake mail which is very convincing and appealing and asks the user for his password.
Answering the security questions also lies under this category.
Drawback :
It is not easy to convince someone to make him give his password.
Guessing generally doesn’t always work ( Although if you are lucky enough it may work!).

Prevention :

  • Never give your password to anyone
  • Don’t believe in any sort of emails which asks for your password

6) Session Hijacking

In a session hijacking attack an attacker steals victims cookies, cookies stores all the necessary logging Information about one’s account, using this info an attacker can easily hack anybody’s account. If you get the cookies of the Victim you can Hack any account the Victim is Logged into i.e. you can hack Facebook, Google, Yahoo.
Drawbacks :
  • You will be logged out when user is logged out.
  • You will not get the password of the user’s account.
  • Will not work if the user is using HTTPS connections.

Prevention :

  • Always work on SSL secured connections.
  • Always keep a look at the url if the http:// is not changed to https:// it means that sniffing is active on your network.
Don't Forget To Join Our Community
×
blogger tipstricksblogger templatesWidget
Tricks and Tips